Winter-Proofing: How to Prepare Concrete Pavements for Cold Weather

As the leaves fall and the air turns crisp, it’s easy to focus on cozying up indoors. But outside, your concrete surfaces are about to face their toughest opponent of the year: winter. From plummeting temperatures to icy precipitation, the coming months can wreak havoc on driveways, sidewalks, and patios.

Many homeowners don’t realize that concrete, despite its strength, is porous and susceptible to the elements. Without proper preparation, the freeze-thaw cycles of winter can turn small cracks into major hazards and leave your smooth surfaces pitted and scaling. Taking the time to prepare your pavement now isn’t just about curb appeal; it’s about protecting a significant investment in your home.

By following a few essential steps before the first deep freeze, you can ensure your concrete emerges next spring as strong and pristine as it is today.

Call 317-777-4973 for Professional Winter Concrete Repair in Indianapolis

Understanding the Threats: Why Winter is Tough on Concrete

To effectively protect your pavement, it helps to understand exactly what it’s up against. Winter attacks concrete on two main fronts: physical stress from temperature changes and chemical stress from deicing agents.

The freeze-thaw cycle

Water is concrete’s quiet enemy. Because concrete is porous, it naturally absorbs moisture from rain and melting snow. When temperatures drop below freezing, that trapped water turns to ice and expands by about 9%. This expansion creates immense internal pressure. When the ice thaws and the water contracts, the pressure releases, only to build up again during the next freeze.

This repetition is known as the freeze-thaw cycle. Over a single winter, your driveway might go through dozens of these cycles. If the concrete is critically saturated—meaning it’s holding more than 86% of its moisture capacity—this pressure can cause the surface to flake off (scaling) or lead to deep structural cracks.

The dangers of deicing salts

We rely on deicers to keep our walkways safe, but they can be devastating to concrete. Common deicers like rock salt (sodium chloride) and calcium chloride work by lowering the freezing point of water. While this melts ice, it also keeps the concrete wet and saturated for longer periods, amplifying the freeze-thaw damage.

Furthermore, certain chemical deicers react with the compounds in the concrete paste itself. For instance, magnesium chloride and calcium chloride can cause a chemical reaction that forms calcium oxychloride—a substance that expands inside the concrete’s pores and causes it to crumble from the inside out. This damage often manifests as “shadowing” or darkening near joints before progressing to disintegration.

Step-by-Step Guide: Preparing Your Concrete for Winter

Protecting your concrete doesn’t require a professional crew for every step. With a free weekend and a bit of effort, you can fortify your surfaces against the cold.

1. Deep clean the surface

Before you can seal or repair anything, you need a clean slate. Dirt, oil, moss, and mildew can prevent sealers from penetrating properly.

  • Sweep and clear: Remove all leaves, debris, and organic matter. Wet leaves left on concrete can leave stubborn tannins stains.
  • Pressure wash: Use a pressure washer to remove grime. For stubborn oil stains, you may need a specialized degreaser. A clean surface ensures that any repair materials or sealers you apply will bond effectively.

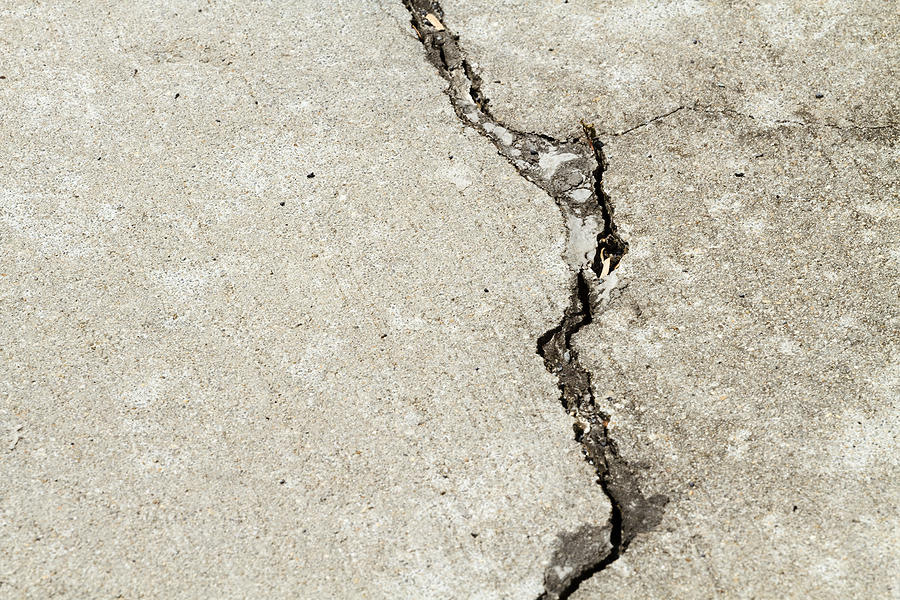
2. Repair existing cracks

Winter will exploit every weakness. A tiny hairline crack today can become a tripping hazard by March as water freezes and expands inside it.

  • Identify damage: Inspect your driveway and walks for concrete cracks, pitting, or uneven slabs.
  • Fill the cracks: For smaller cracks, a flexible concrete filler or polyurethane caulk works best. These materials move with the concrete as it expands and contracts, keeping the seal tight even during temperature swings.
  • Level uneven slabs: If you have slabs that have sunk or heaved, water can pool in these low spots, leading to severe freeze-thaw damage. These areas often require professional leveling to ensure proper drainage.

3. Apply a high-quality sealer

Sealing is the single most effective defense against winter damage. A good sealer acts as a raincoat for your concrete, preventing water absorption while allowing the concrete to “breathe.”

  • Choose the right weather: Apply sealer when the temperature is above 50°F (10°C) and no rain is forecast for 24 hours. The surface must be completely dry.
  • Application: Most sealers can be applied with a roller or a low-pressure sprayer. Follow the manufacturer’s instructions carefully regarding coverage rates and drying times.

Request a Free Concrete Repair Estimate in Indy

Product Recommendations for Winter Prep

Not all concrete products are created equal. When browsing the aisles of your local hardware store, look for products that specifically address winter threats.

Choosing the right sealer

For winter protection, penetrating sealers are generally superior to film-forming sealers.

  • Silane or Siloxane Sealers: These penetrate deep into the pores of the concrete and are hydrophobic, meaning they repel water and salts. They are highly recommended by industry experts for resisting freeze-thaw damage and scaling caused by deicers.
  • Avoid: Film-forming acrylic sealers (often labeled as “wet look”) sit on top of the surface. While they look nice, they can wear away quickly under snow shovels and don’t offer the same deep protection against internal moisture saturation.

Safer deicing alternatives

If your concrete is less than a year old, you should avoid chemical deicers entirely—use clean sand for traction instead. For older concrete, be selective:

  • Avoid: Ammonium sulfate or ammonium nitrate. These are fertilizers that will chemically attack and destroy concrete paste. Also, use magnesium chloride and calcium chloride sparingly, as they are more aggressive than plain sodium chloride (rock salt).
  • Use sparingly: No deicer is completely harmless. Use the minimum amount necessary to loosen the ice, then mechanically remove the slush.

Concrete Maintenance Tips for Winter

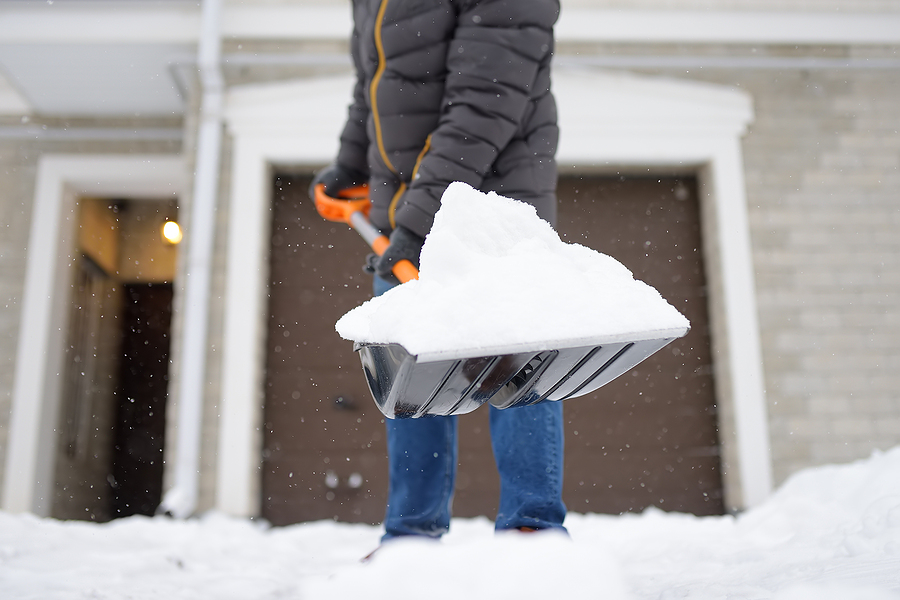
Once winter arrives, your maintenance routine should shift from prevention to damage control.

  • Keep it clear: Shovel snow promptly. The longer snow sits, the more likely it is to melt and refreeze, saturating the concrete.
  • Ensure drainage: Make sure gutters and downspouts aren’t draining directly onto your driveway or walkways. You want to minimize the amount of water flowing over your concrete surfaces.
  • Don’t chip the ice: When removing ice, avoid chopping at it with a metal shovel or ice pick, which can chip the concrete surface. Use a plastic shovel or a broom whenever possible.

Wrapping Up

Your concrete pavements are the literal foundation of your home’s exterior. While they are built to last, they aren’t invincible. The combination of moisture, freezing temperatures, and harsh chemicals creates a perfect storm for deterioration. By understanding these threats and taking proactive steps—cleaning, repairing cracks, and applying a penetrating sealer—you can extend the life of your driveway and walkways by years.

Don’t let a harsh winter turn your smooth pavement into a crumbling headache. A little preparation now saves you from expensive repairs later.

Need help getting your concrete winter-ready? If you’ve noticed uneven slabs, sinking driveways, or cracks that seem too big for a DIY fix, it’s time to call in the experts. Contact Us Today for a free estimate on concrete leveling and crack repair in Indianapolis. Let us help you protect your home before the snow flies.

Place Your Call Now

Related Post: Top 5 Signs Your Concrete Needs Leveling or Lifting

Stop the Spread: A Guide to Concrete Crack Filling and Joint Control

Walking out to your driveway or patio should be a pleasant experience, a moment to appreciate the solid foundation of your home. But spotting a new jagged line running across the surface can instantly ruin that feeling. A concrete crack isn’t just an unsightly blemish; it is often a signal that the slab is under stress.

Concrete is one of the most durable building materials on earth, yet it is not immune to the forces of nature. Temperature fluctuations, shifting soil, and heavy loads all conspire to test its limits. While some minor surface crazing is cosmetic, deeper cracks can allow water to seep in, freeze, expand, and eventually threaten the structural integrity of the entire slab.

Understanding the mechanics behind these fractures is the first step toward fixing them. This guide explores why concrete breaks, the critical role of joint control, and the processes involved in repair. While minor issues can sometimes be patched at home, preserving the longevity of your investment often requires the precision of professional care.

Call 317-777-4973 for Professional Concrete Crack Filling & Joint Control in Indianapolis Indiana

Decoding the Damage: Types of Concrete Cracks

Before you can address a problem, you must identify it. Not all cracks are created equal, and the shape and location of a fissure tell a specific story about what is happening beneath the surface.

Plastic Shrinkage Cracks

These are among the most common issues, typically appearing shortly after the concrete is poured. When water evaporates from the surface faster than the “bleed water” can rise to replenish it, the surface dries out and shrinks, pulling apart to create thin, shallow cracks. While generally not a structural threat, they create weak points where water can enter and cause freeze-thaw damage later.

Heaving and Settling Cracks

The ground beneath your concrete is rarely static. If a large tree root pushes up (heaving) or the soil compresses unevenly due to decomposition or water erosion (settling), the concrete lacks the support it needs. These cracks are often uneven, creating tripping hazards where one side of the slab is higher than the other. These are serious structural indicators that often require professional leveling or replacement.

Overloading Cracks

Concrete has incredible compressive strength, but it has limits. If a slab designed for a residential patio is subjected to the weight of a heavy RV or construction equipment, it may fracture. These cracks simply mean the load exceeded the concrete’s capacity.

The Science of Joint Control

It is a common saying in the industry: there are two types of concrete—concrete that has cracked, and concrete that will crack. Because concrete shrinks as it cures and expands as it heats up, movement is inevitable. Joint control is the engineering solution to this natural behavior.

Think of control joints as “planned cracks.” By creating a weakened line in the slab at specific intervals, we tell the concrete exactly where to crack when it shrinks. Instead of an ugly, wandering spiderweb across the center of your patio, the crack occurs neatly at the bottom of the joint where it is invisible.

Expansion and Isolation Joints

While control joints handle shrinkage, expansion joints handle heat. In hot weather, concrete expands. If the slab is tightly wedged between a house and a sidewalk, it has nowhere to go but up, resulting in buckling. Expansion joints use a compressible material (like fiberboard or cork) between slabs to absorb this growth, ensuring the concrete can move without destroying itself.

Schedule a Concrete Crack Repair Assessment in Indy 📅

A Guide to Filling Concrete Cracks

Addressing cracks early prevents water infiltration, which is the primary enemy of concrete longevity. While small hairline fractures can be a DIY project, it is vital to use the right materials. Using rigid concrete patch on a moving crack will only result in the patch popping out a few months later.

Step 1: Preparation and Cleaning

A filler will never bond to a dirty surface. The crack must be free of loose debris, oil, and weeds. A wire brush is usually sufficient for small cracks, but professional concrete repair services often use high-pressure air or water to ensure the void is completely clean. For wider cracks, it may be necessary to use a chisel to undercut the edges, creating a “keyed” shape that holds the filler in place physically as well as chemically.

Step 2: Selecting the Material

This is where most homeowners struggle. The material must match the application.

  • Rigid Fillers: Epoxy or grout is used for cracks that are no longer moving.
  • Flexible Sealants: Polyurethane or silicone-based sealants are necessary for active cracks or control joints that need to expand and contract.

Step 3: Application

For liquid fillers, a bottle or caulking gun is used to overfill the crack slightly, as the material will often settle. It is then tooled smooth with a trowel. For deeper cracks, a “backer rod”—a foam rope—is inserted first to prevent the expensive filler from sinking endlessly into the sub-base.

The Importance of Professional Intervention

While the steps above outline the basic mechanics of repair, the reality of execution is far more complex. Professional concrete crack filling and joint control services offer advantages that off-the-shelf tubes of caulk simply cannot match.

Diagnosis Before Repair

A professional does not just cover the problem; they analyze the cause. Filling a crack caused by ongoing settlement without addressing the soil issue is a waste of money. An expert can determine if the slab needs stabilization before the cosmetic repair is performed.

Industrial-Grade Materials

The sealants and fillers available at big-box hardware stores often have higher shrinkage rates and lower UV resistance than professional-grade compounds. Professionals utilize high-performance polyureas and epoxies designed to withstand heavy traffic and extreme weather for decades, not just seasons.

Aesthetics and Precision

Concrete repair is as much art as it is science. Mismatched colors and sloppy trowel work can make a patch look worse than the original crack. Professionals have the tools and expertise to grind surfaces flush and color-match materials, making repairs blend seamlessly with the existing slab.

Proactive Maintenance for Long-Term Health

Once your concrete is repaired, or if you are lucky enough to have a pristine slab, maintenance is key to keeping it that way.

  • Keep Seals Fresh: Joint sealants eventually dry out. Inspect them annually. If they are peeling or cracking, they are no longer keeping water out of the sub-base.
  • Manage Water Flow: Ensure downspouts direct water away from your driveway and sidewalks. Saturation of the soil beneath the concrete causes settling and heaving.
  • Avoid Harsh Chemicals: De-icing salts are brutal on concrete. They cause surface scaling and can corrode the reinforcement inside the slab. Opt for sand or kitty litter for traction instead.

Protect Your Property Investment

Concrete is a substantial investment in your property’s value and curb appeal. While it is durable, it requires attention to remain safe and attractive. Ignoring cracks allows water to undermine the foundation of the slab, leading to costly replacement projects down the road.

Don’t let minor fractures turn into major headaches. If you notice shifting joints, widening cracks, or uneven surfaces, it is time to bring in the experts.

Contact our team today for a professional assessment. We can identify the root cause of your concrete issues and provide a lasting, high-quality solution that restores the look and safety of your home.

Call Our Office Directly

Related Post: Fixing Pool Deck Cracks: The Role of Concrete Lifting in Poolside Safety